I recently started getting Azure credits and decided to have some fun seeing if I could host a Palworld server there. However, I ran into difficulties when I started to search for documentation to help me. Many skipped steps or were too vague. I ended up having to cobble together a couple of different pages and sift through Azure's documentation to find everything I needed. As a result, I decided to try to save other people some time by making my own documentation on how I created my server. I will include steps for creating a Palworld server based on Ubuntu Linux and Windows.
If you don't need help setting up a VM, and just want to set up a Palworld Server in Ubuntu Linux or Windows, you can jump to those sections. Note that the benefit of these install methods is they use SteamCMD, which is separate from a regular Steam client install. They also involve logging into SteamCMD anonymously, which means you can be logged into your Steam client playing Palworld while the server also runs, or have the server running on one machine while playing on another machine. Also, if you are installing Palworld Server on personal equipment, you will need to set up port forwarding to whichever port you hve Palworld set to use (default is 8211).
Creating the VM
Initially creating the VM in Azure is pretty straight forward and similar regardless of whether your end result will be Linux or Windows. One very important note with any VM in Azure, you will only be charged for the time your VM is running. So, to save on cost, shut down your VM when no one is using it. You can also set it to auto-shutdown at a certain time each day if you want to make sure you don't leave it running indvertently. I will also provide some Powershell scripts that you can use to check the status of your Azure VM in a separte post later.
- Login the your Azure account with the Azure portal.
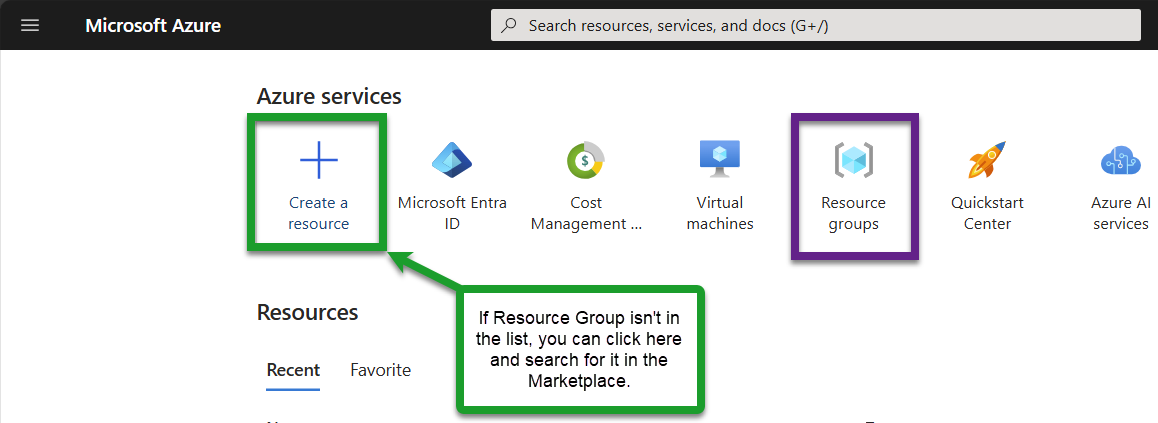
- You should initially be taken to the Dashbord. From there you can select "Resource Group" to access the "Create a resource group" process.
- If you don't see "Resource Group" listed, select the "Create a Resource" option and search for "Resource Group" in the Marketplace.
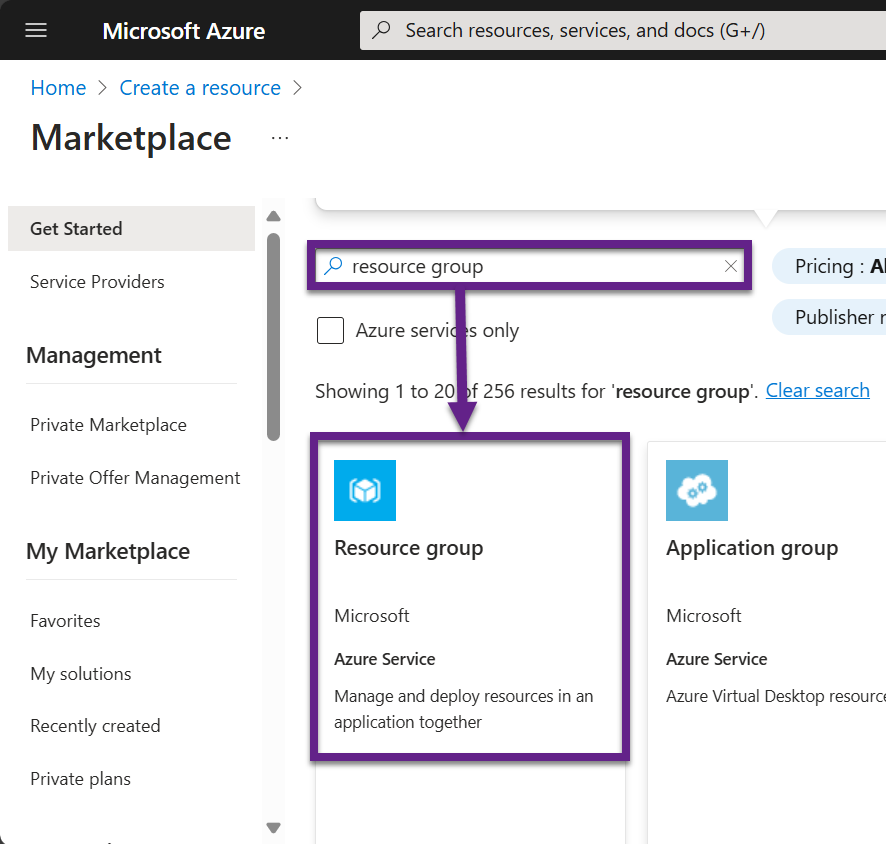
- You should now be on the "Create a Resource" page. Select the subscription if the one you want your VM in is not listed, and then type a name in the "Resource group" text input field.
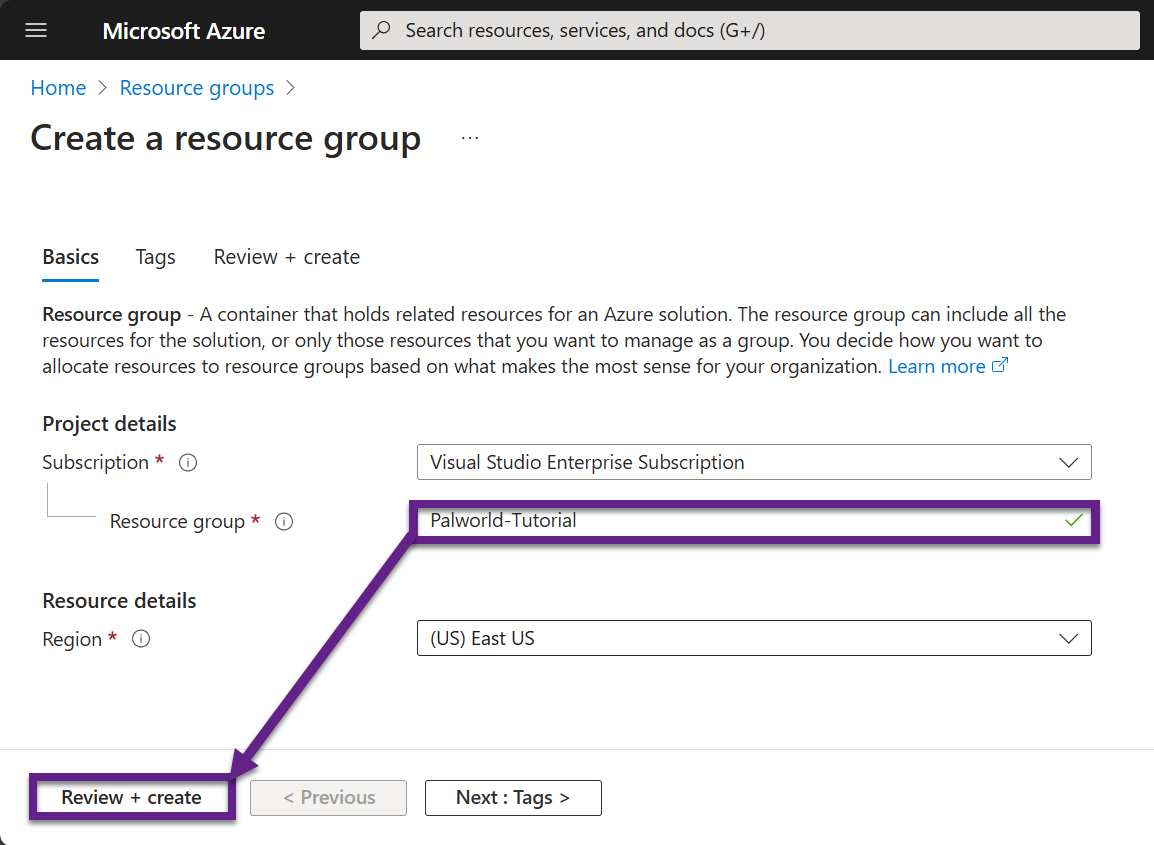
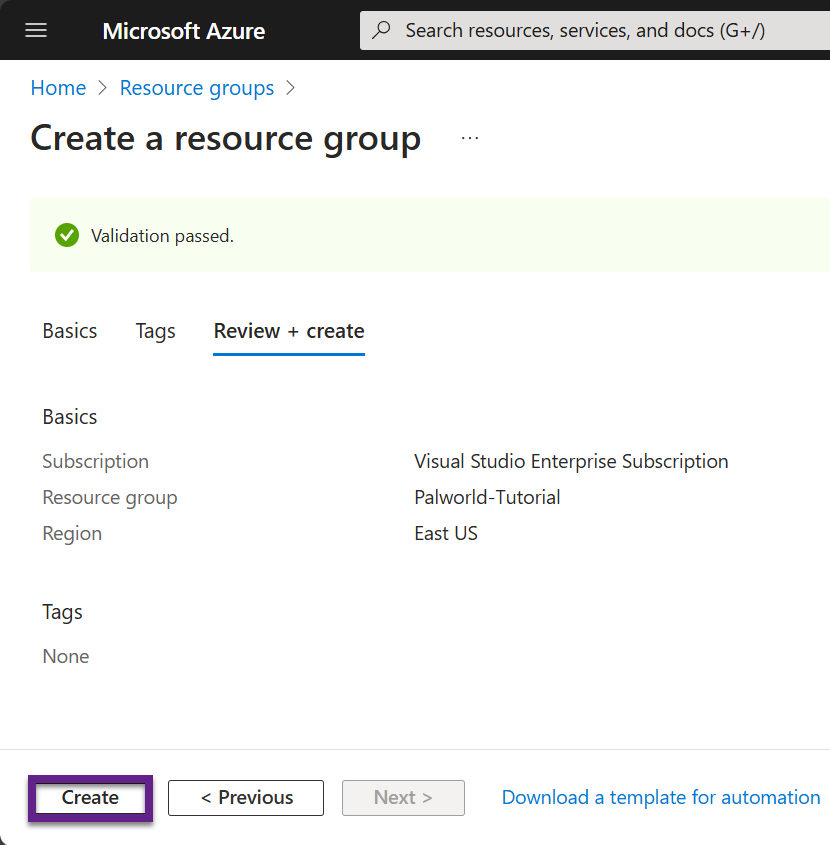
- Next click "Review + Create" and then "Create" on the next screen as long as long as everything looks like what you selected and typed.
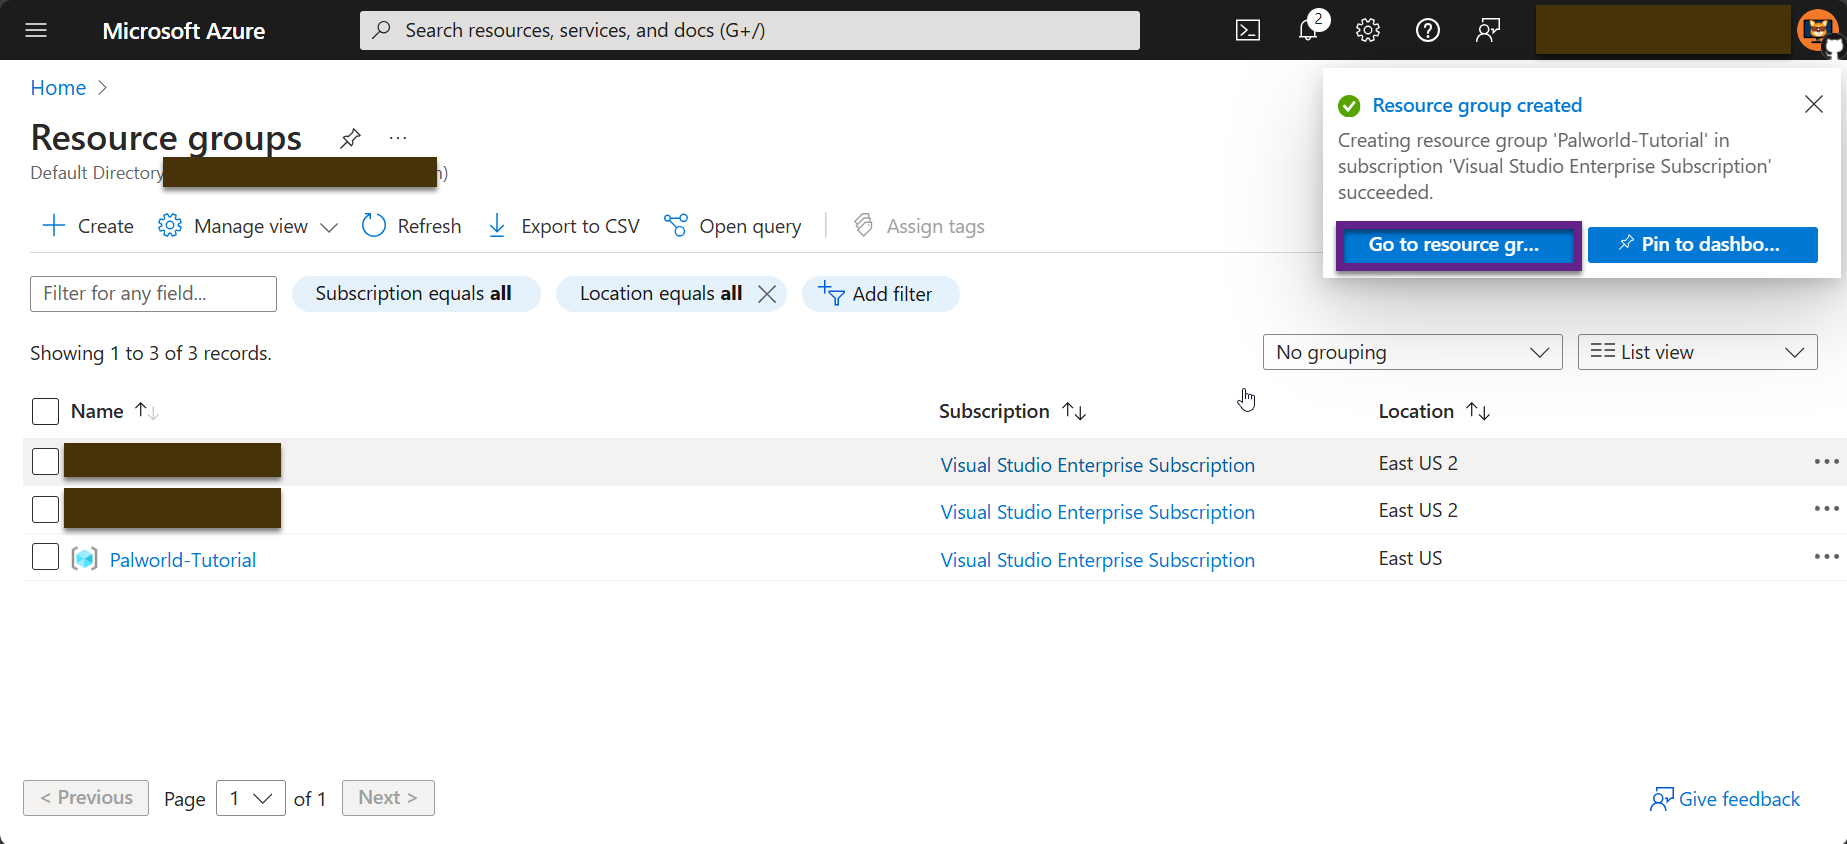
- You will be taken back to where you initially selected to start creating the group. A pop up will display that you can select "Go to Resource" from, or you can type the name in the search bar to get to the resource group.
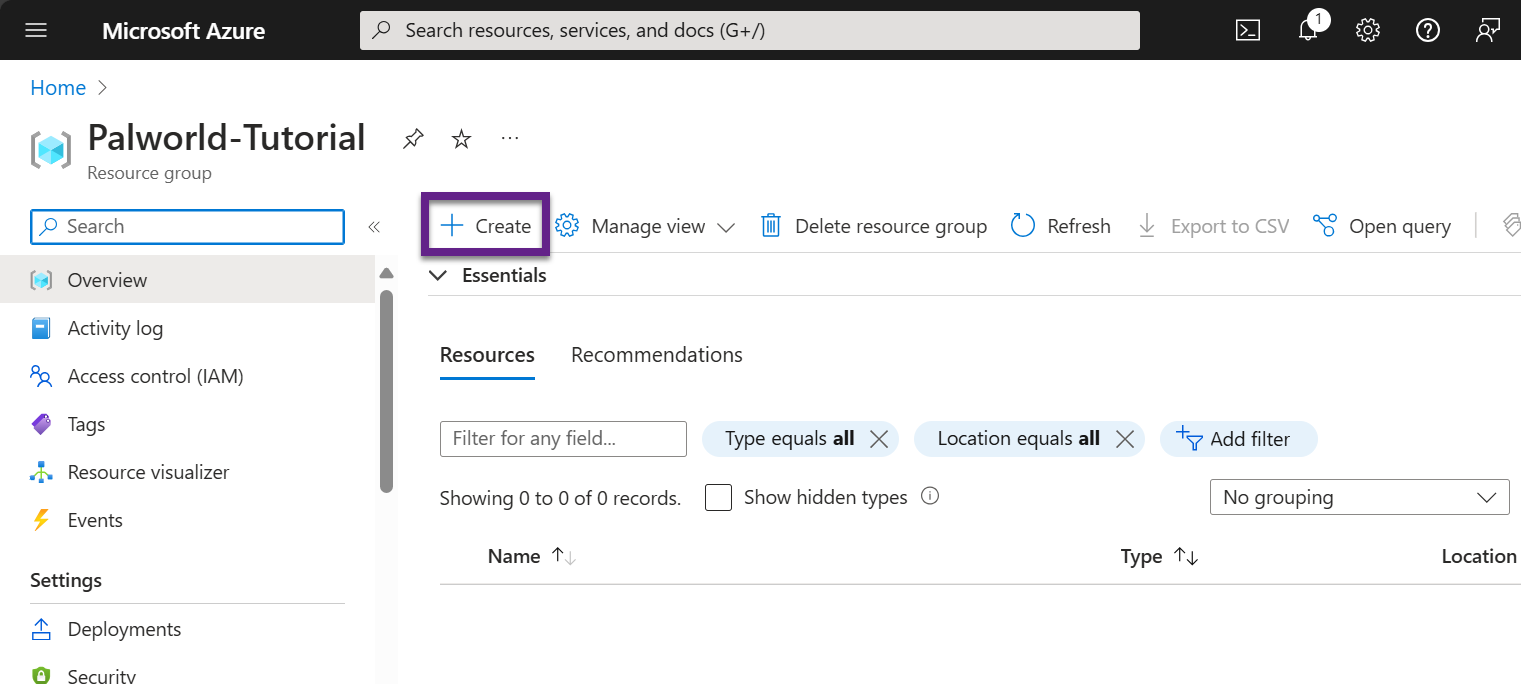
- Once you are at the resource, you will see a list of resources that is currently empty. We can start changing that by clicking on the "Create" option.
- This will take us to the Azure Marketplace. From here, go to the "Search the Marketplace" text input field and type "Virtual Machine".
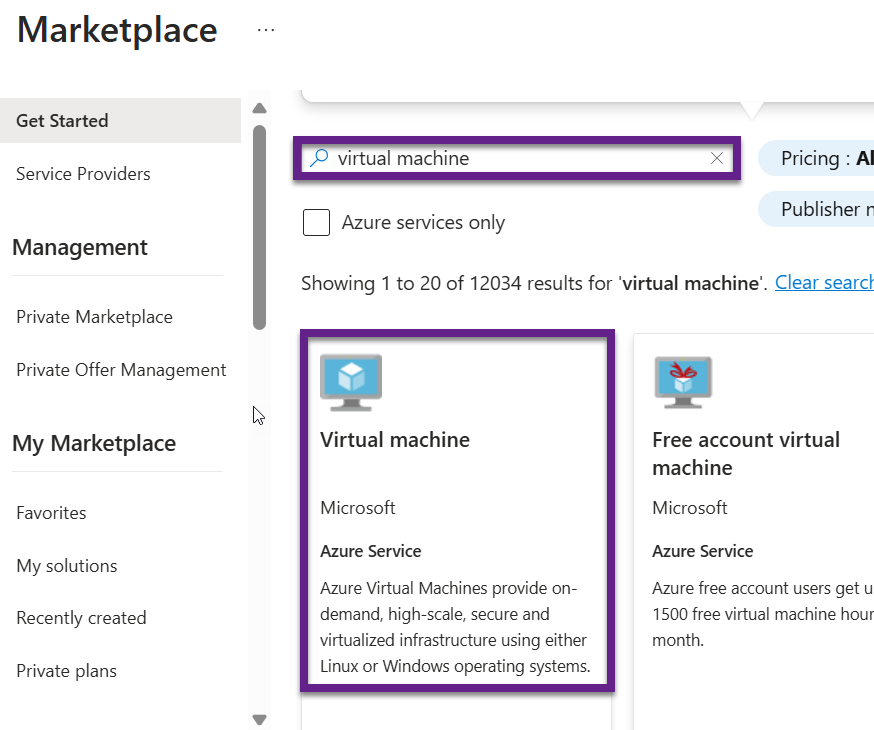
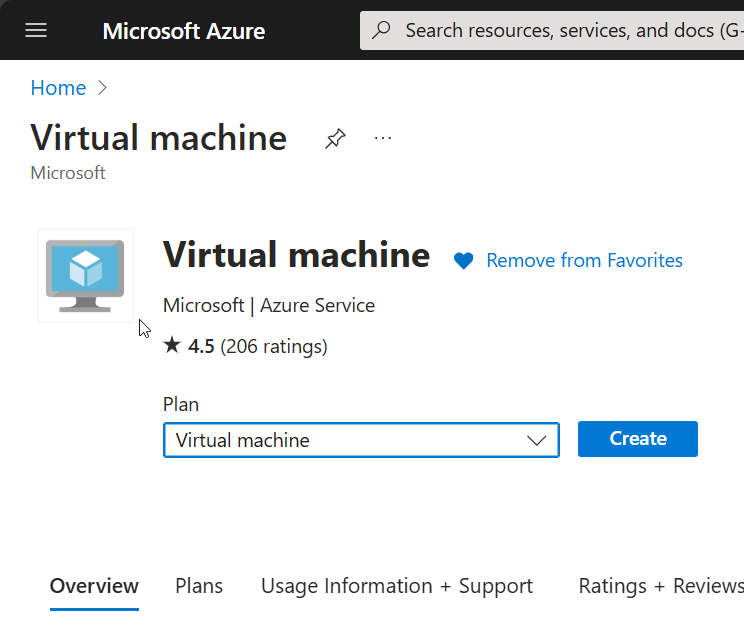
- Click on the Virtual Machine option, and then click the "Create" button on the next page.
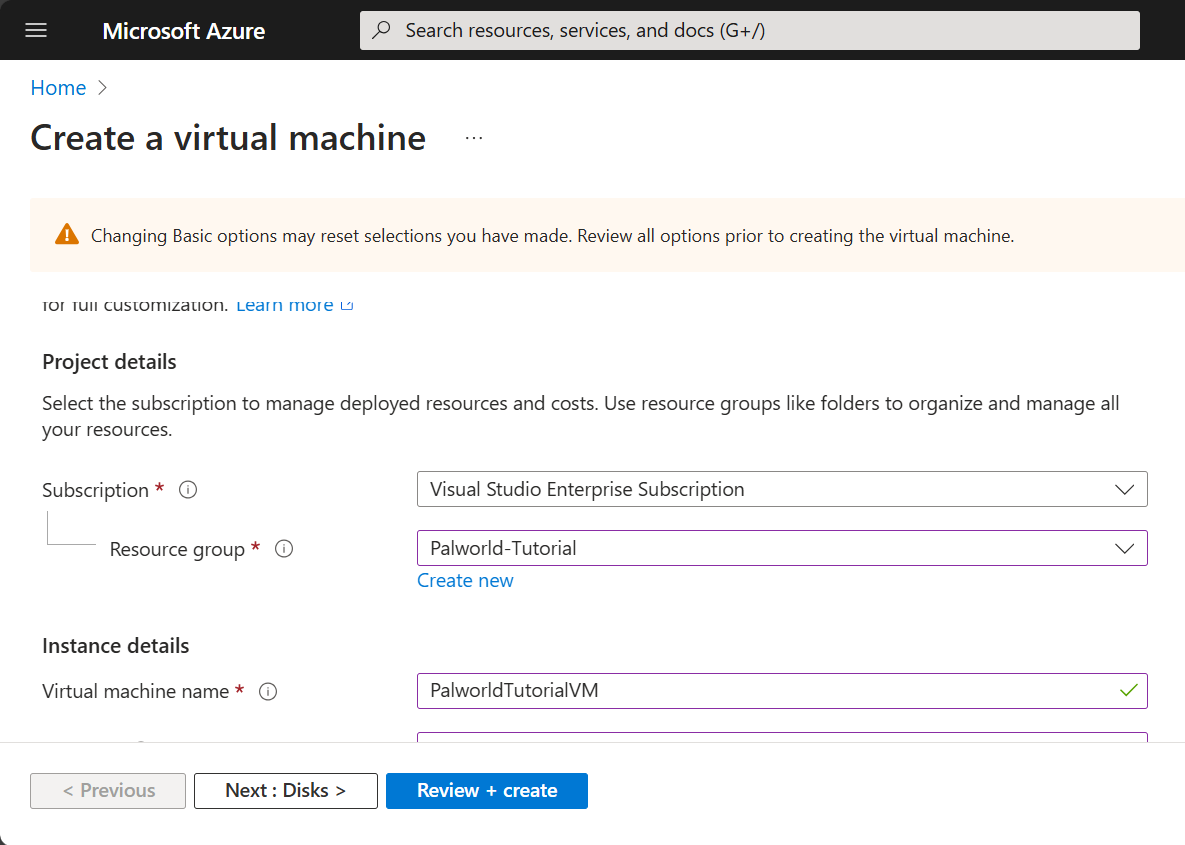
- This is where things begin to split just slightly based on whether you are making a Linux VM or a Windows VM. The following options are what you should select and fill out:
- Resource Group: Name of Resource Group you created
- Virtual machine name: Name you want to use
- Image: Select either "Ubuntu Server 22.04 LTS - x64 Gen2" or "Windows Server 2022 Datacenter: Azure Edition - x64 Gen2".
- Size: Standard_B4as_v2 - 4 vcpus, 16 GiB memory (current cost / month)
- Authentication Type: (Recommend selecting the Password type for Linux VMs. Windows VMs default to this.) Enter the username & password you wish to use.
- Click "Review + Create" and then "Create" on the next screen. The next screen will step through deploying the VM. This will involve it creating all the necessary parts. Most will have a data disk, network security group, virtual network, the VM itself, nd possibly other parts.
- Click the "Go to Resource" option once the creation is complete. You can click away from the page while it is deploying, but you just might not be notified when it finishes. However, it will show up under the Resource Group once it is done. If you go to the Resource Group, click the item with the Virtual Machine name you entered and "Virtual machine" under the "Type" column.
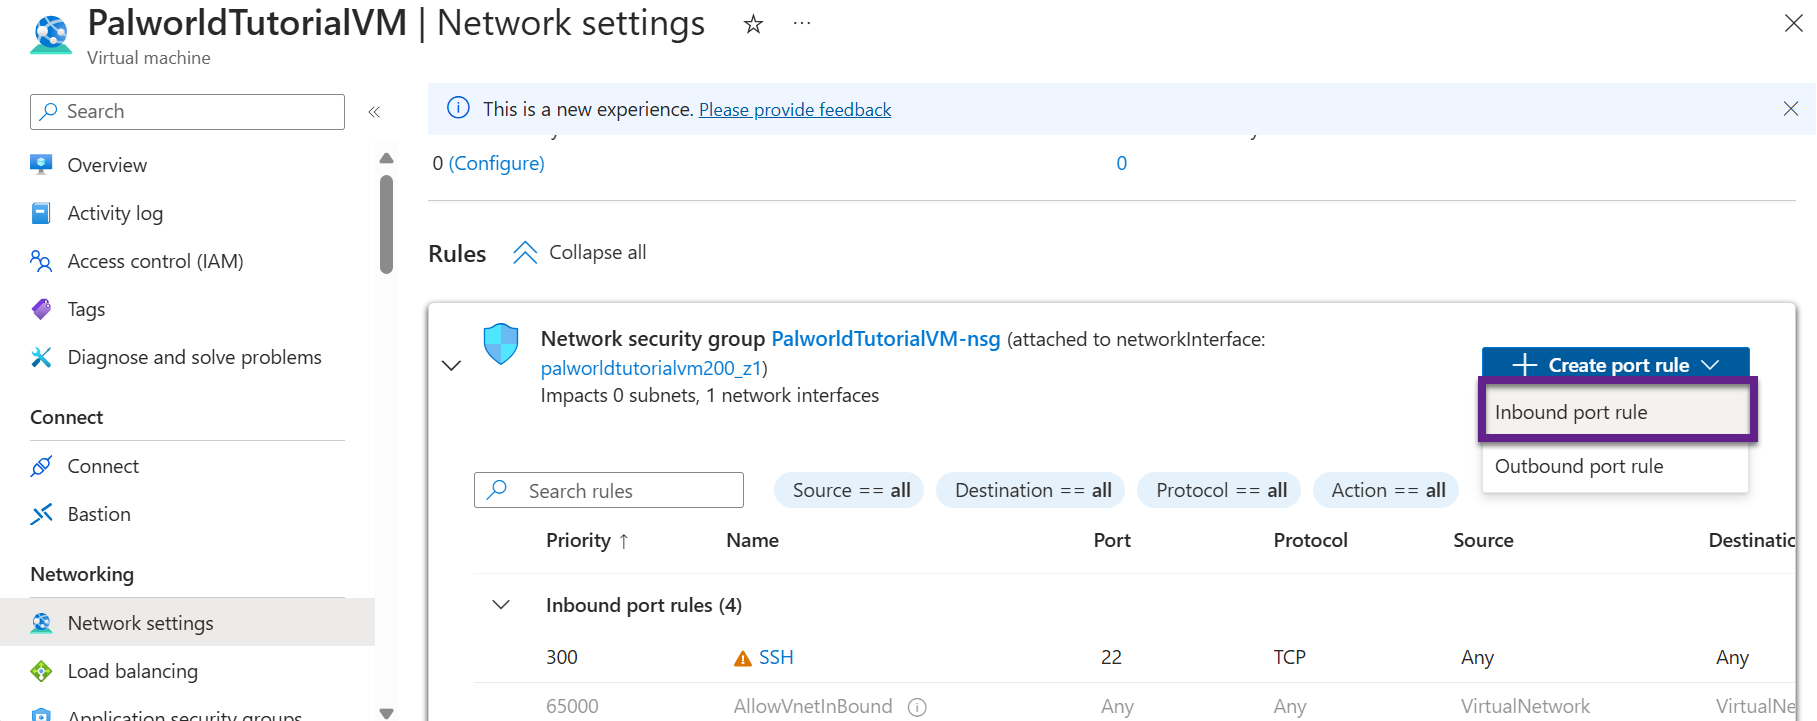
- Once in the VM dashboard, click the "Network settings" option in the side navigation bar.

- Once on the Network Settings page, scroll down to the "Network security group" section, click the "Create port rule" button, and select the "Inbound port rule" option.
- An "Add inbound security rule" pane will display. There you need to set the following options:
- Destination port ranges: 8211
- Protocol: UDP
- Priority: 100
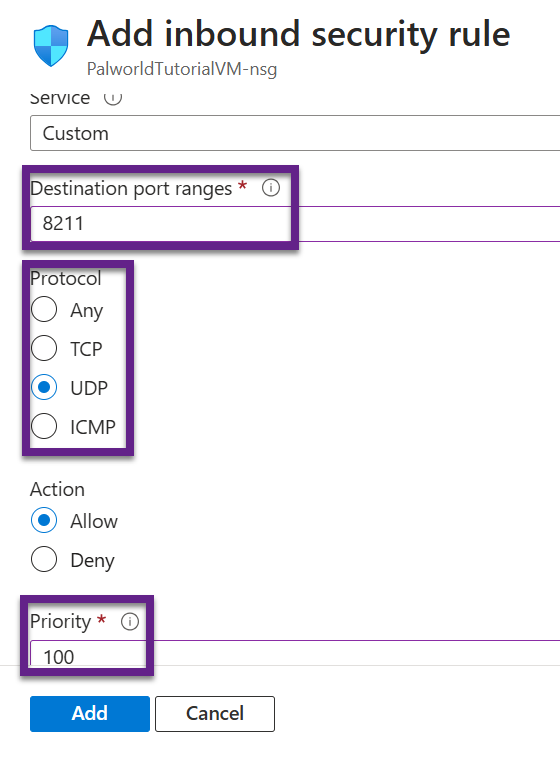
- You can also set a description on the pane to help you quickly identify th purpose of the rule later. For example, I usually add something like "Palworld Connections".
- Once you have set the options, click "Add". This will ensure that the necessary Palworld connections can make it to the virtual machine.
- IMPORTANT: You will still need to add a firewll rule on the VM itself once you remote into it the first time, but we will go into that later.
- The VM automatically starts up after creation. So, make sure to shut down the VM if you are not continuing at this time to avoid extra charges.
- The VM should now be set up and ready for you to begin setting up the Palworld server. This is where things completely split based on what VM type you are using.
Setting Up Palworld on a Linux VM
Setting up Palworld Server on a Linux server can be a little more confusing for some because it is a purely command line OS with no graphic interface. However, it isn't too bad. One thing to keep in mind is that this tutorial is based around Ubuntu Linux. If you are using a different variant of Linux, you may need to use different commands for some things. Granted most of the process will be the same.
Additionally, while I do not know how well it works on the Azure instance of Linux server, it is possible to install a graphic interface addon to Ubuntu Server.
You could elect to use regular Ubuntu, but I wouldn't do that in Cloud environment because it might incur much more cost than Ubuntu server.
Connect to Your Linux VM
I prefer using mRemoteNG to connect to my Linux VM. You can technically use command line, but I like being ble to save my connections.
- Downlod and install mRemoteNG if you are electing to use that method, and run it once it is installed.
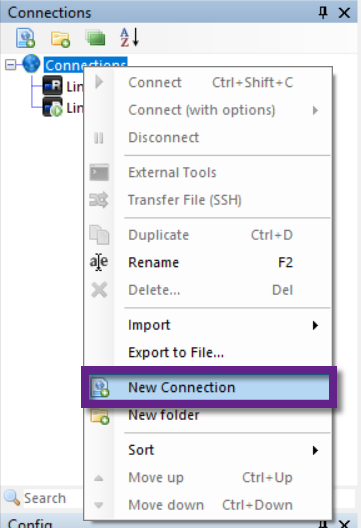
- There should be a first connection added when you run it the first time. If not, right-click on "Connections" in the side nav panel and select "New Connection".
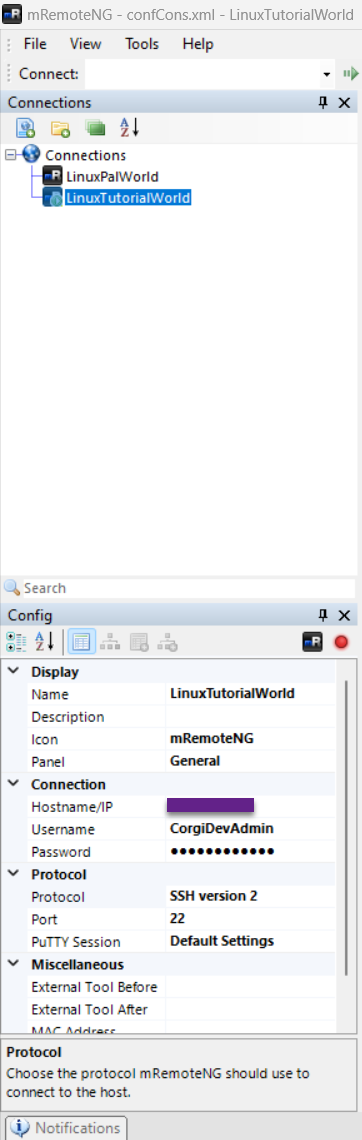
- Click on your new connection and fill in the information similar to the following:
- Name: Name to help you identify your connection in mRemoteNG
- Hostname/IP: Public IP of your VM as listed on its dashbord in Azure
- Username: Admin username you set during VM creation
- Password: Admin password you set during VM creation
- Protocol: Select "SSH version 2" from the drop-down list
- Port: Make sure it says 22
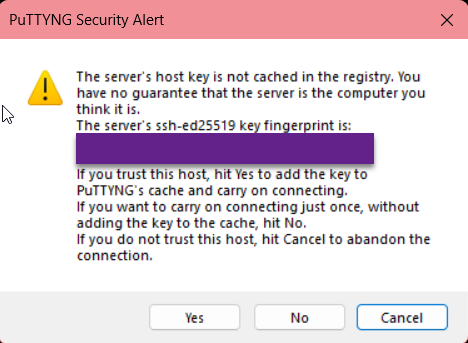
- Double-click on your new connection to connect. The first time you connect you will get a security prompt just letting you know that the fingerprint of the VM's host server is not stored yet. Click "Yes" to continue.
- You will know that you have successfully connected when the screen displays the start up information for Ubuntu Server with the end showing a command prompt that is formatted as your admin name, an @ symbol, and your server's name followed by "
:~$". You're now ready to move on to the prep and setup steps.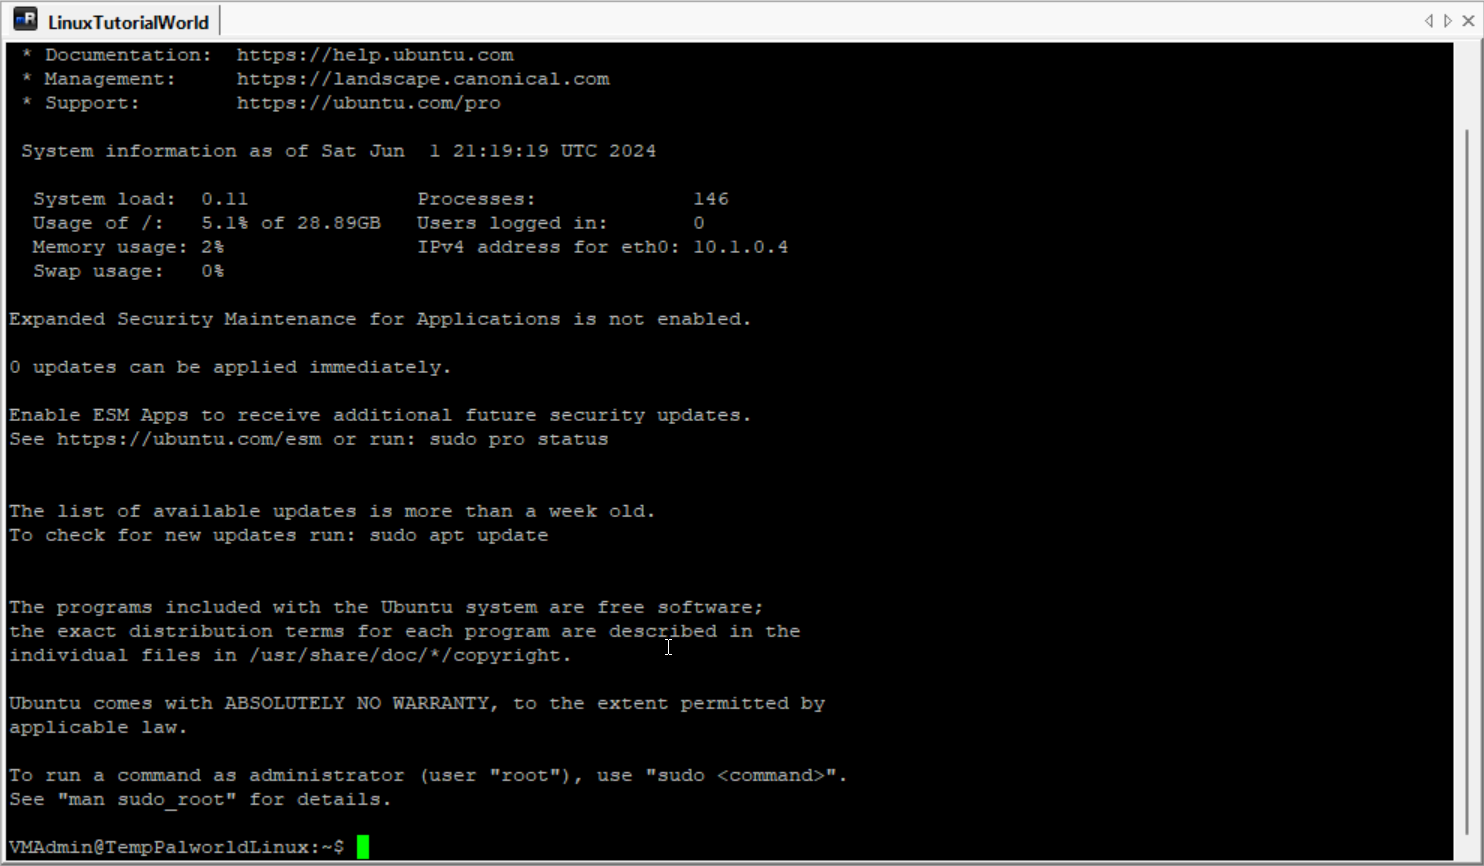
Preparing Ubuntu for Palworld Install
To prepare for installing Palworld Server, we need to do the following:
- Ensure the Ubuntu Server is up to date
- Update the package list
- Install the "software-properties-common" package to make performing repository changes easier
- Enable 32-bit architecture because SteamCMD is only 32-bit
- Rerun update
- Add the 8211 port to the incoming rules for the Linux firewall
The following command will accomplish all of this. It is technically 7 commands. I just combined it all into one for easier copying and pasting. It will run like this because the 2 ampersands (&) between each command basically tell Linux to run one commnd and then run the next in line as long as the previous one succeeds. Additionlly, after copying the command, you can paste it in Linux by just right-clicking in the command line window.
Start of Command
sudo apt update && sudo apt upgrade -y && sudo apt install software-properties-common && sudo dpkg --add-architecture i386 && sudo add-apt-repository multiverse && sudo apt update && sudo ufw allow 8211
End of Command
Installing SteamCMD
SteamCMD allows you to run a lightweight version of Steam that does not have the GUI. It is also useful since you can run it with an anonymous login. This allows you to install the Palworld Server software without locking up your Steam account.
To install SteamCMD:
- The following command will start the install of SteamCMD:
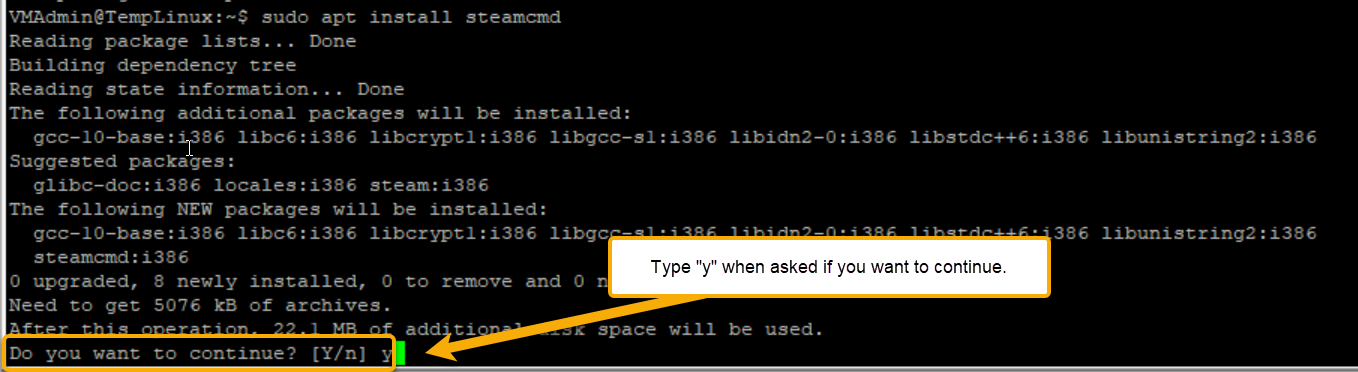
sudo apt install steamcmd
- SteamCMD will install until it gets to a point where it asks you to confirm you wish to continue. Type the letter Y and press enter.
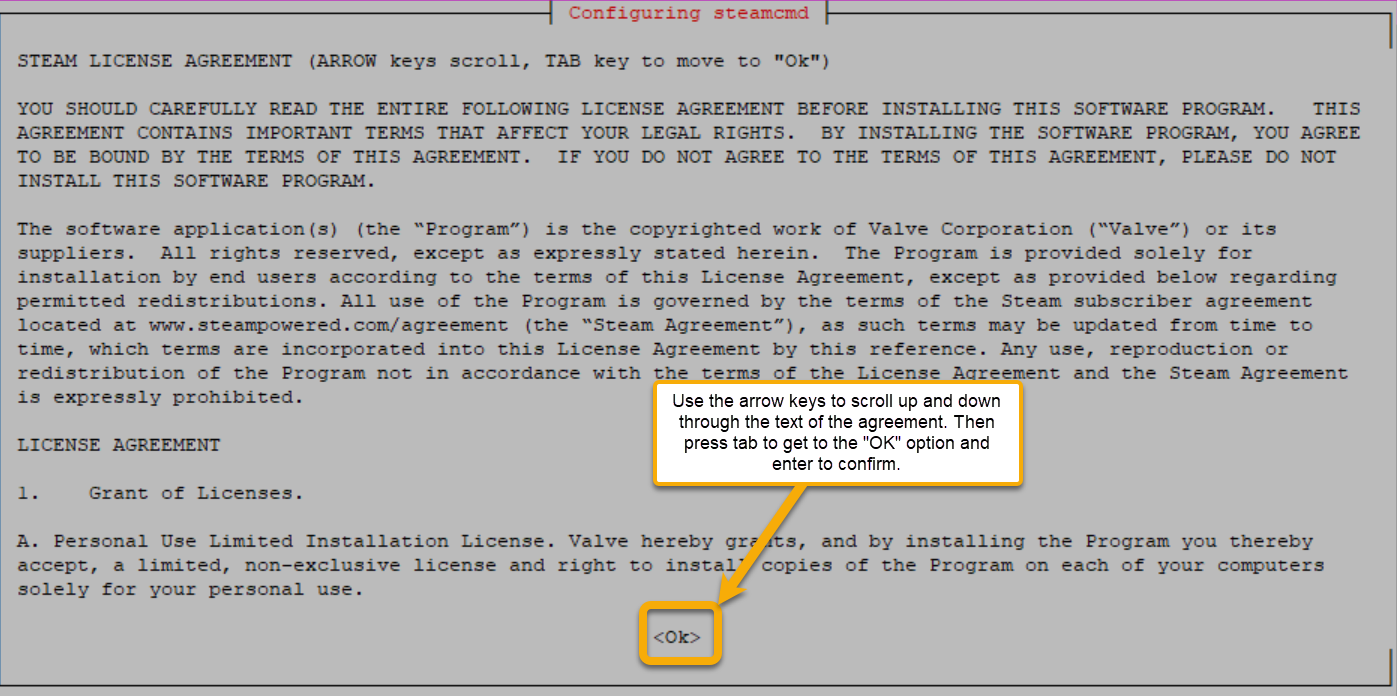
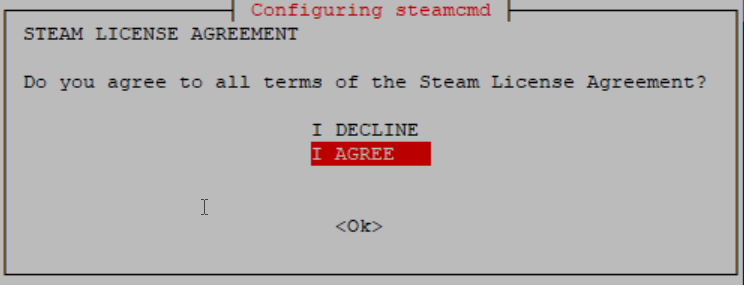
- A new prompt will display featuring the SteamCMD agreement. Use the arrow keys to scroll up and down through the agreement text. When you are ready, press the tab key to move to the "OK" option and press enter.
- Next you will be asked to confirm whether or not you agree with the terms. You must agree if you want to continue the install. Use the arrow keys to select your choice. Then press tab to move to "OK". Finally, press enter to confirm your choice.
- The install will continue on until it finishes.
Create a User to Run SteamCMD as in Linux
It is best to not run all of the SteamCMD processes as the sudo user. Hence why it is recommended to create a separate user just for running SteamCMD. This provides a separation between what programs have access to do, and who can use them.
To create and modify the user for use with SteamCMD:
- Run the following command to initially create the user:
sudo useradd -m steam
- Next we need to modify the account's "
.bashrc" file to adjust the path environment variable. This ensures the user can find the file path for SteamCMD. Otherwise, the "/usr/games" pth is missing. Open the file for editing with the following command:sudo nano /home/steam/.bashrc
- With the file open, use the down arrow key to move all the way to the bottom of the file.

- Now we need to paste in the following line to the file to add the "/user/games/" path to the Steam user's "PATH:" environment variable.
export PATH="/usr/games/:$PATH"

- Press "CTRL+X" to exit the file. You will be asked if you want to "Save modified buffer". Simply type the letter Y and press enter to confirm.
- Anytime we perform any actions related to SteamCMD or Palworld, we will need to swap to the Steam user. You can always confirm what user you are running a command as by looking at the start of the command line when it is awaiting a command. It always starts with the current username. Use the following command to switch to the Steam user:
sudo -u steam -s
- When we initially switch users, we will still be in the former user's home directory. You can tell this by looking at the part of the command line's ready state that is between the colon and dollar sign. If it is anything other than a tilde (~), then you are not in the Steam user's home directory. Use the following command to switch to the home directory of the Steam user:
cd ~
Now we are ready to install Palworld Server.
Install Palworld Server on Linux
steamcmd +force_install_dir '/home/steam/Steam/steamapps/common/steamworks' +login anonymous +app_update 1007 +quit
mkdir -p /home/steam/.steam/sdk64
cp '/home/steam/Steam/steamapps/common/steamworks/linux64/steamclient.so' /home/steam/.steam/sdk64/
steamcmd +force_install_dir '/home/steam/Steam/steamapps/common/PalServer' +login anonymous +app_update 2394010 validate +quit
Starting Up Your Palworld Server
We can now try starting up our Palworld Server for the first time. This will give us a chance to see if everything set up correctly, and is also needed to create some files we will need to edit before we can try connecting to it with a Palworld client.
- Switch to the directory where the start script is located using the following command:
cd /home/steam/Steam/steamapps/common/PalServer
- Start the server using the following command:
./PalServer.sh
- If the server starts, you should see some text similar to the following, but don't be put off by the fail messages. They are expected for now:
[S_API FAIL] Tried to access Steam interface SteamNetworkingUtils004 before SteamAPI_Init succeeded.
- Press
CTRL+Cto stop things for now so we can make some config changes.
Configuring Your Palworld Server
We need to make some config changes to our server that will help make it function better and allow us to customize some settings.
- We need to start by copying over the default settings file into the server's individual settings file to give us a starting point. Otherwise, the settings file for the server is empty at first by default. Do so using the following command:
cp /home/steam/Steam/steamapps/common/PalServer/DefaultPalWorldSettings.ini /home/steam/Steam/steamapps/common/PalServer/Pal/Saved/Config/LinuxServer/PalWorldSettings.ini
- Similar to what we did with the bashrc file earlier, we are now going to edit the settings file with nano using the following command:
nano ~/Steam/steamapps/common/PalServer/Pal/Saved/Config/LinuxServer/PalWorldSettings.ini
- For easier editing, press the Escape (Esc) key on your keyboard and then release it. Then press shift + 4. This will cause nano to do text wrapping so you can see more.
- Use the arrow keys to move around the text to the spots you need to edit. The main ones to edit first include:
- ServerName: A name for your server. Not required, but this can be helpful if users connect to multiple servers.
- ServerDescription: Not required, but could be useful for the same reasons as the name.
- AdminPassword: Sets a password for admin functions on the server.
- ServerPassword: Sets a password for users who want to connect to your server. Not required unless you want one.
- PublicIP: Input the Public IP listed in the dashboard for the VM in Azure.
- You can now edit other settings too if you would like. I recommend changing the "
DeathPenalty" setting. By default it is set to "All", which means you drop your items and Pals when you die and have to go pick them all back up. You can change it to one of the following:DeathPenalty=0: No death penaltyDeathPenalty=1: drop items onlyDeathPenalty=2: drop items and gearDeathPenalty=All: drop pals, items, and gear
- Once you have made all the changes you want, press ctrl+x, y, and enter to save and exit.
Have Palworld Server Start at Boot
If you'd like your server to start at boot in Linux, you can do that.
- First type "exit" and press enter if you are still running as the Steam user from earlier.
- Now start creating a service to start Palworld when Ubuntu boots using the following command:
sudo nano /etc/systemd/system/palworld.service
- You will find yourself in the now more familiar Nano editor, which we need to paste some text into.
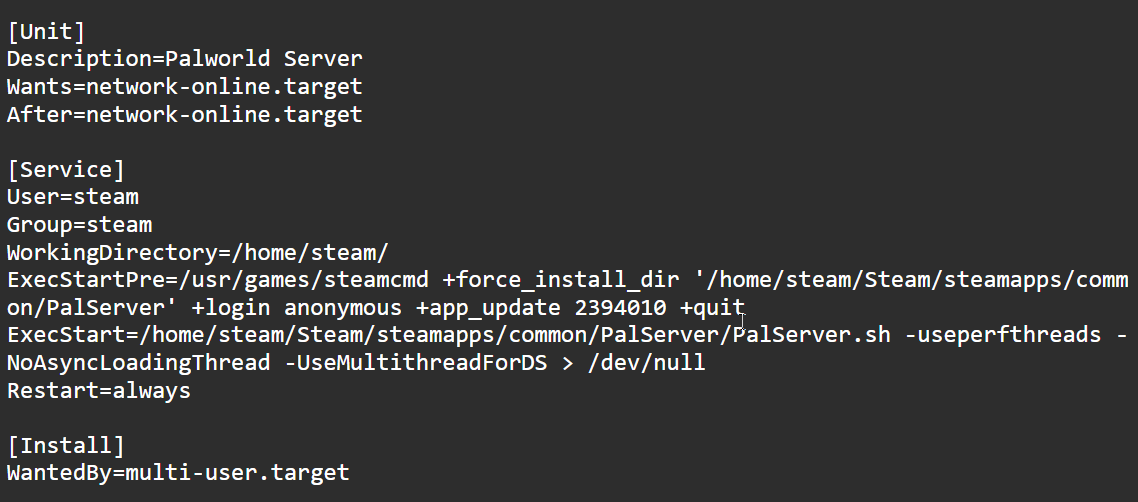
- When you go to paste this in, it will have an extra line in between the lines of text. It is because I couldn't get it to display properly across browsers for some reason. So, for now, I had to kind of play around to get it to at least show that each line is a different line rather than shoving it all together. You'll need to remove those extra blank lines manually after pasting it until I can fix it. I have included a screenshot of what it should look like for reference.
- Paste in the following text in order to let Ubuntu know what to start and pass along some additional options the developer recommends:
- [Unit] Description=Palworld Server Wants=network-online.target After=network-online.target [Service] User=steam Group=steam WorkingDirectory=/home/steam/ ExecStartPre=/usr/games/steamcmd +force_install_dir '/home/steam/Steam/steamapps/common/PalServer' +login anonymous +app_update 2394010 +quit ExecStart=/home/steam/Steam/steamapps/common/PalServer/PalServer.sh -useperfthreads -NoAsyncLoadingThread -UseMultithreadForDS > /dev/null Restart=always [Install] WantedBy=multi-user.target
- The following is a screenshot of how the text should appear:
- Now press ctrl+x, y, and then enter to save and exit.
- Enable the server using the following command:
sudo systemctl enable palworld- You can later disable it by just swapping "enable" for "disable".
- I ran into issues with certain ports being used. So, I recommend restarting your Ubuntu machine at this point just to avoid issues.
- Now you can jump to the section about how to connect to your server.
Setting Up Palworld on a Windows VM
Much of this is written from being on a Windows machine. In particular, I am on a Windows 11 machine. However, this just impacts how you connect to the machine. Once you are connected and interacting with the VM itself, it is a completely separate machine.
Connect to the VM
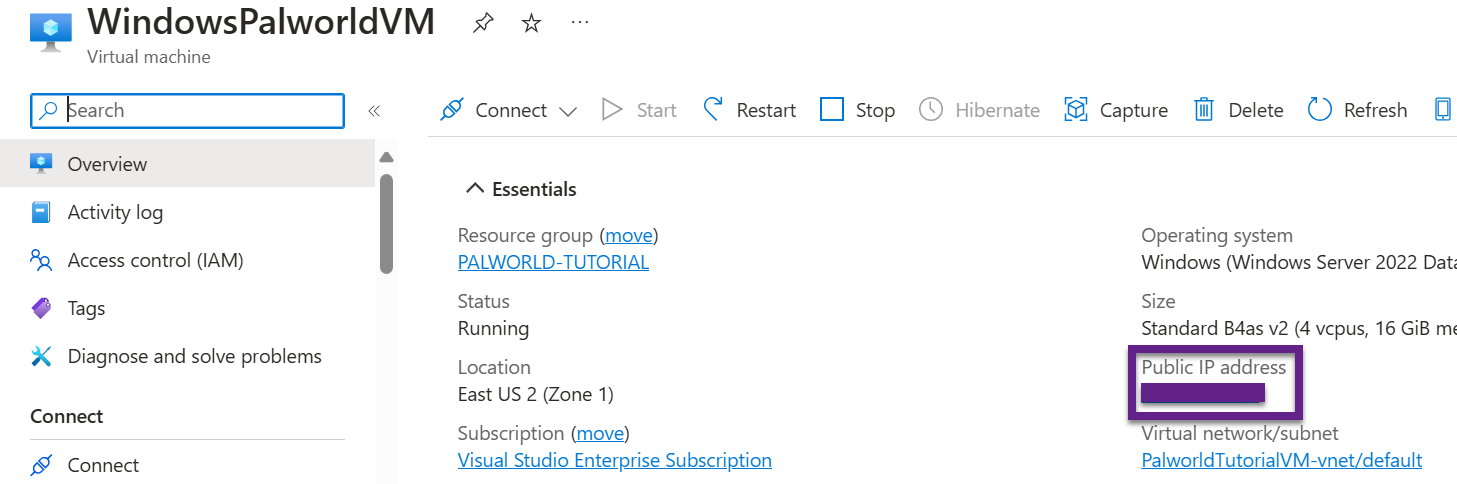
- Go to the Windows VM in the Resource Group and observe the "Public IP address" listed.
- Open the Start menu on your computer and type "RDP" to search for the "Remote Desktop Connection" program on Windows. Select the application when it shows in the results.

- Once the RDP application opens, enter the IP address in the "Computer" field followed by ":3389", which is the RDP port set by default in Azure.
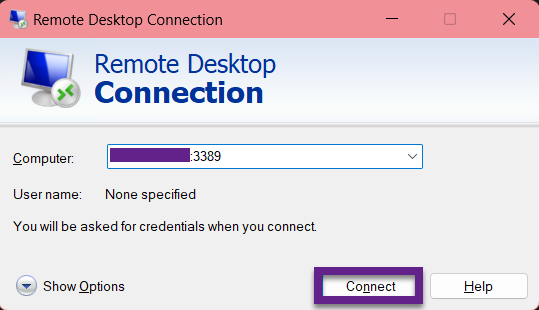
- Click the "Connect" button and then enter in the credentials you previously set for the VM's Admin authentication credentials.
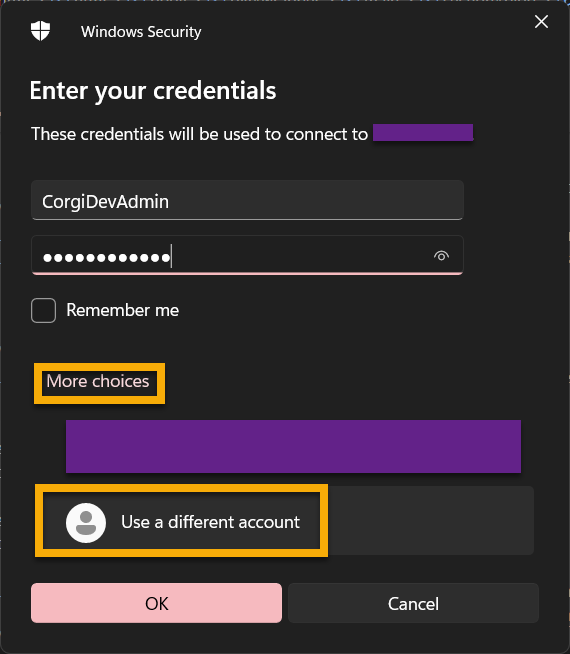
- The credential window will default to your Windows account. You will need to click the "More choices" button and select "Use a different account" before entering in the credentials you set during VM creation.
- The credential window will default to your Windows account. You will need to click the "More choices" button and select "Use a different account" before entering in the credentials you set during VM creation.
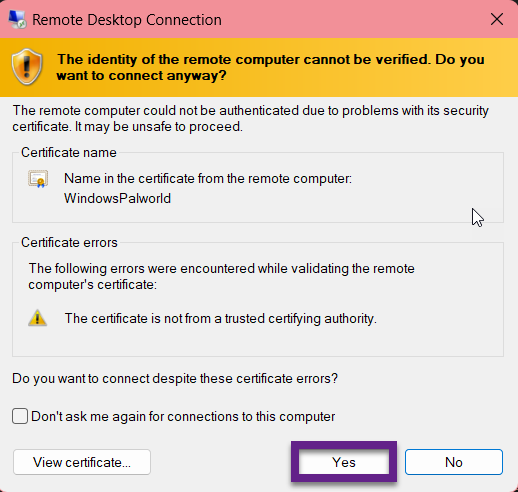
- You may be asked to confirm you trust the connection. If so, click "Yes" to confirm and it should connect.
Set Firewall Rule on VM
This firewall rule is basically the same rule as the one we set in Azure. You have to also set the rule in the VM itself.
- Once connected to the VM, open the start menu and type "firewall". Select the "Windows Defender Firewall with Advanced Security" result when it appears.

- Once the firewall application opens, click the "Inbound Rules" option under the side nav panel, and then click the "New Rule..." option from the "Actions" panel that displays.

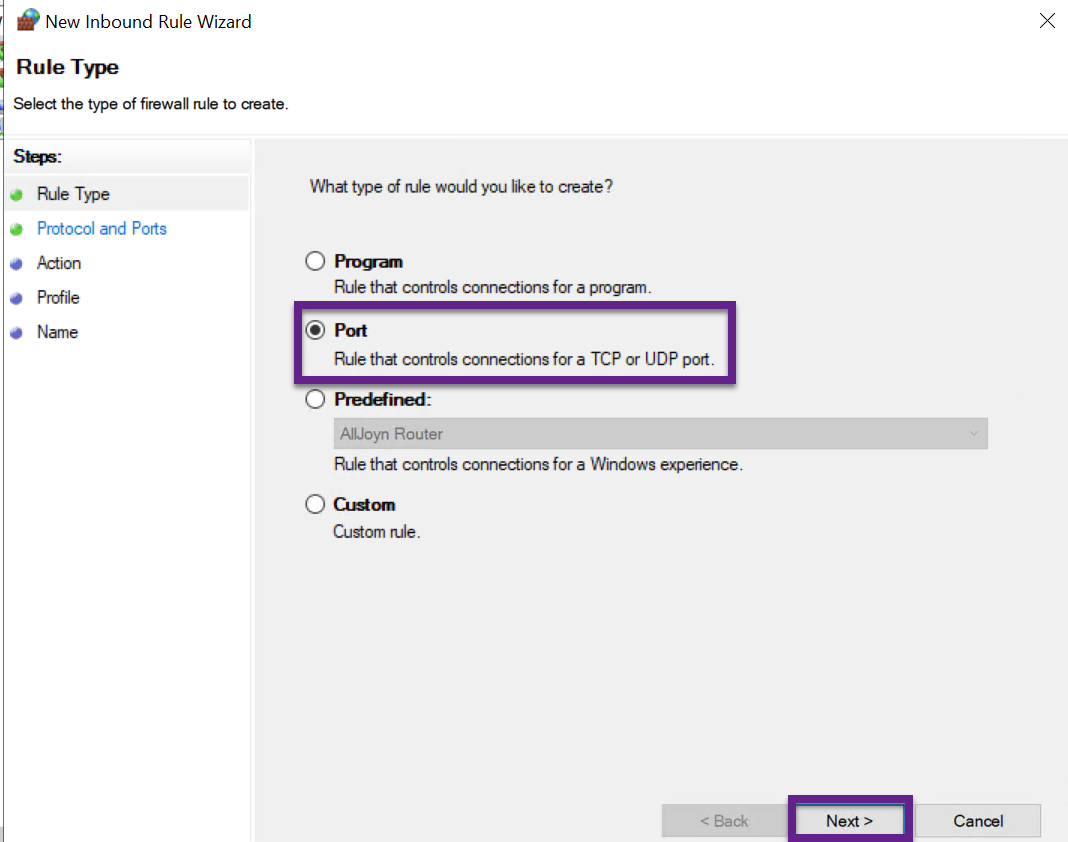
- On the Inbound Rule Wizard that opens, select the "Port" option, and then click "Next".
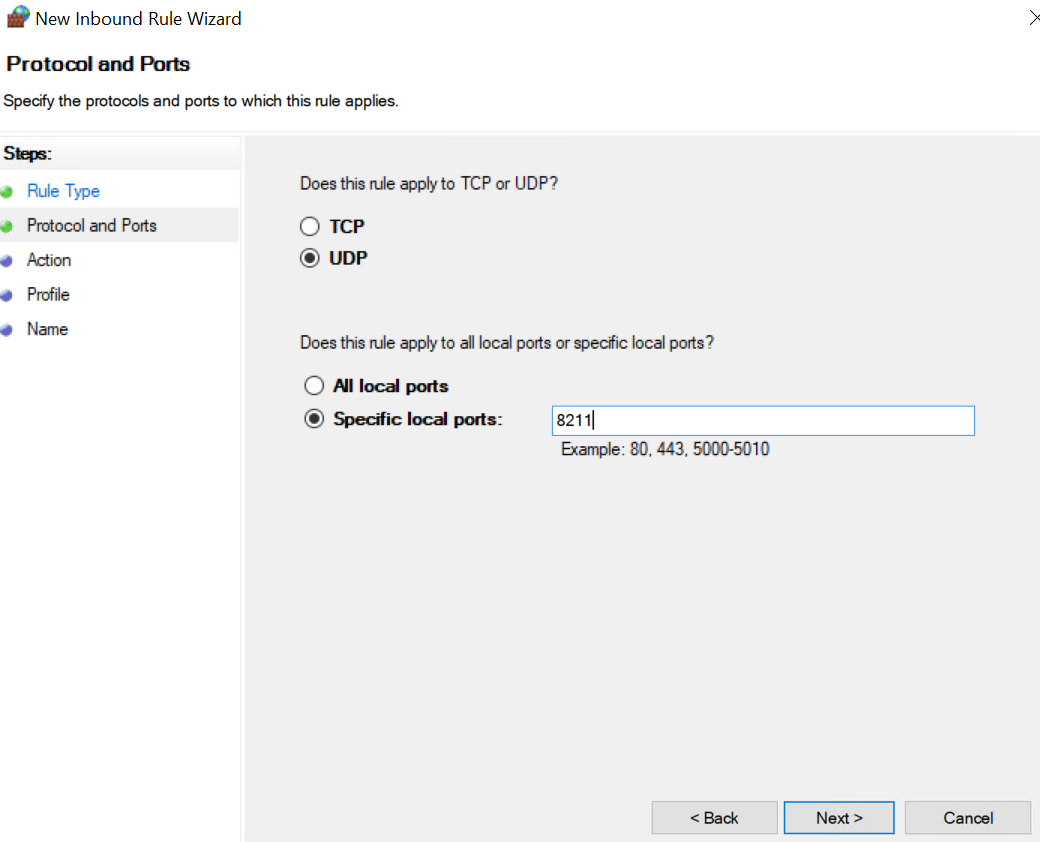
- On the next screen, select the "UDP" option and then enter "8211" in the "Specific local ports" field before clicking "Next".
- Click Next again on the next screens until you get to the screen with the "Name" field. In the Name field, give the rule a name that helps you identify it later. For example, I named mine "Palworld Connections".
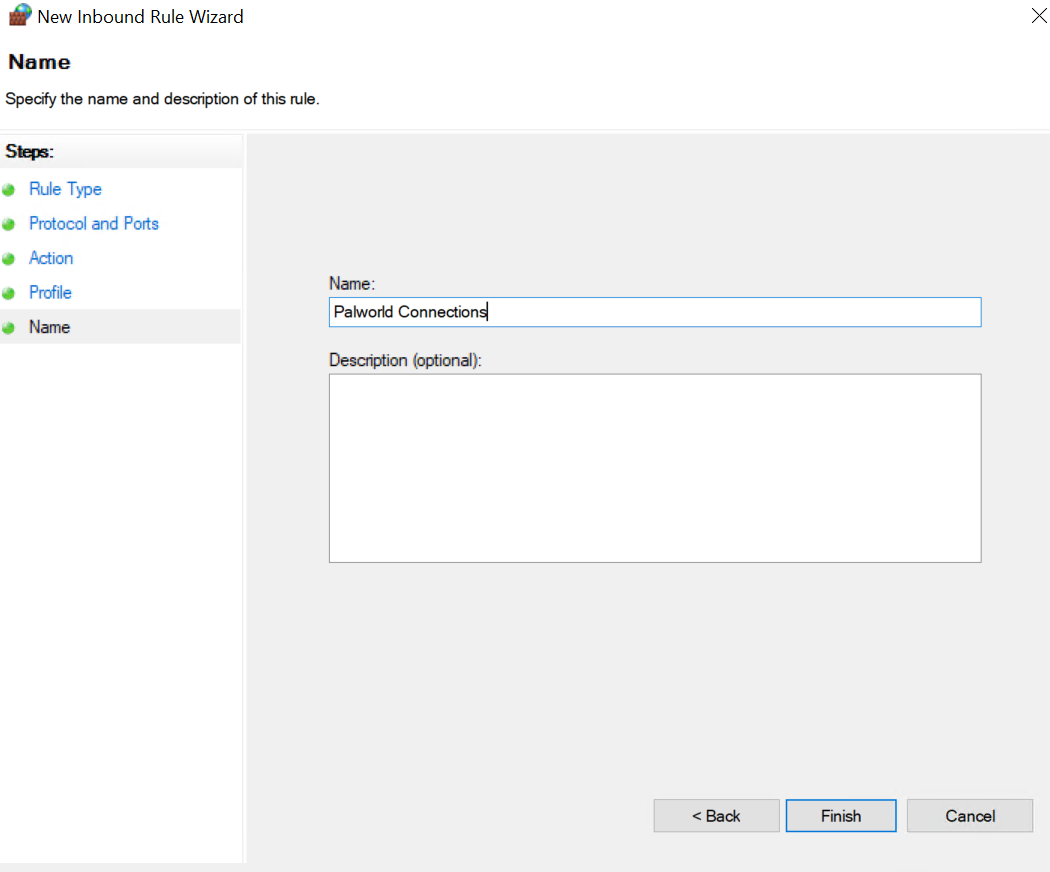
- Click "Finish" to finalize the rule creation.
Windows Palworld Server Pre-Requisites
There are some things we have to install before we can begin installing the Palworld dedicated server needed to run a Palworld server. Once you get all of these installed, I recommend restarting the VM before continuing.
- SteamCMD for Windows
- SteamCMD allows you to basically run Steam without the graphic interface, which allows it to be a lot more lightweight.
- For this one, I extract the installer into a "SteamCMD" folder in the VM's C drive.
- Once this finishes running, you can press CTRL + C to close the command prompt window.
- DirectX 9.0
- This link should install to the server. The main link you get when you search is a downloader installer and doesn't work within the VM for some reason.
- Before running this, create a "DirectX" folder in your Download folder. It extracts ALOT of files, but does not allow you to create a folder during the extraction process. So you need the folder you want the files to go into before you run it.
- Once you run it to extract the files, go into the DirectX folder you created and extracted the files into.
- Inside the folder, scroll to and run the "DXSETUP" executable to install DirectX.
- Visual C++
- Select the "X64" link in the table of download links.
Installing Palworld Server on Windows Server
- Navigate to the SteamCMD directory. It will be wherever you extracted and ran SteamCMD from initially to install it, and then run the "SteamCMD.exe" file.
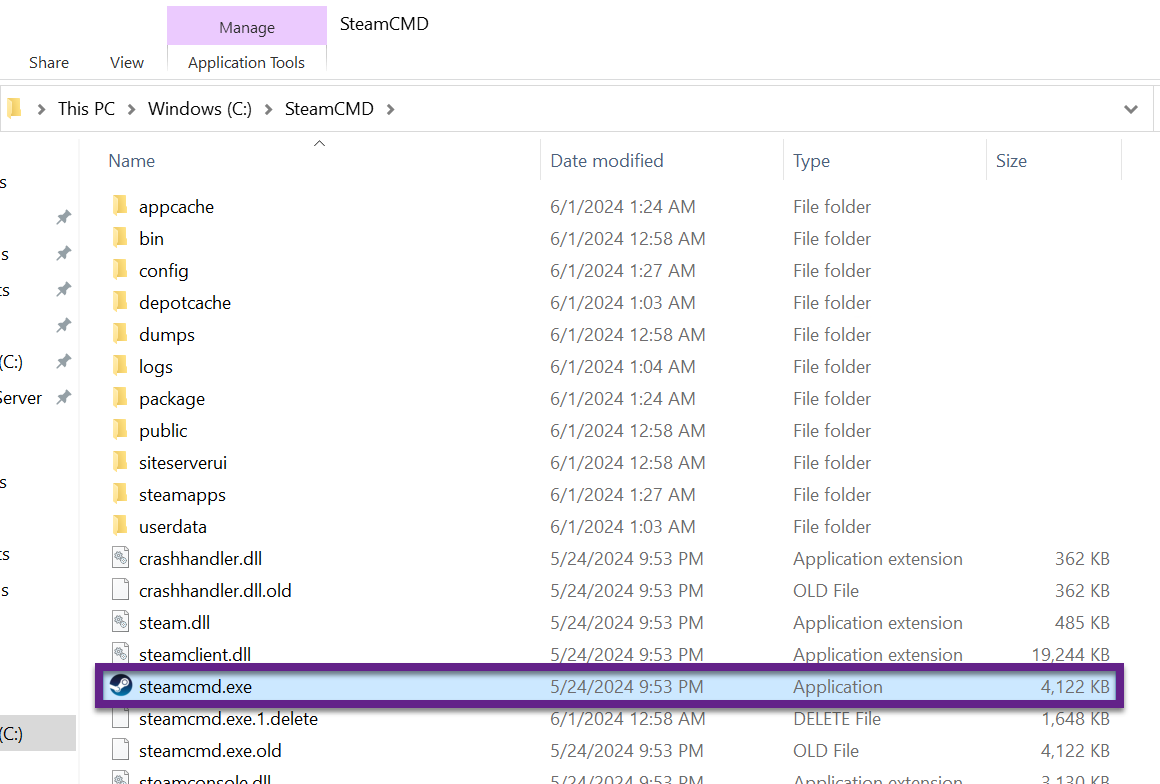
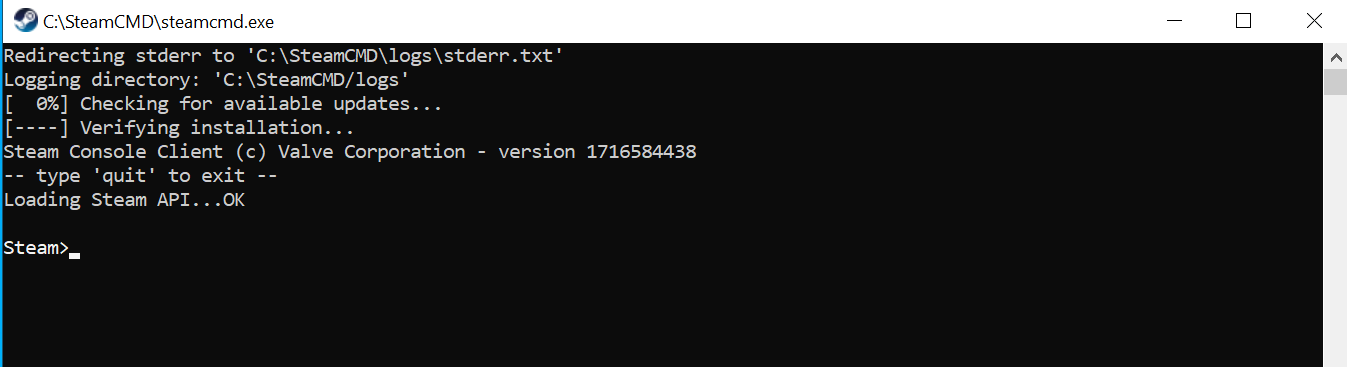
- A Command Prompt window will open and SteamCMD will start up. When it finishes, the window will display "Steam>" instead of the usual C drive.
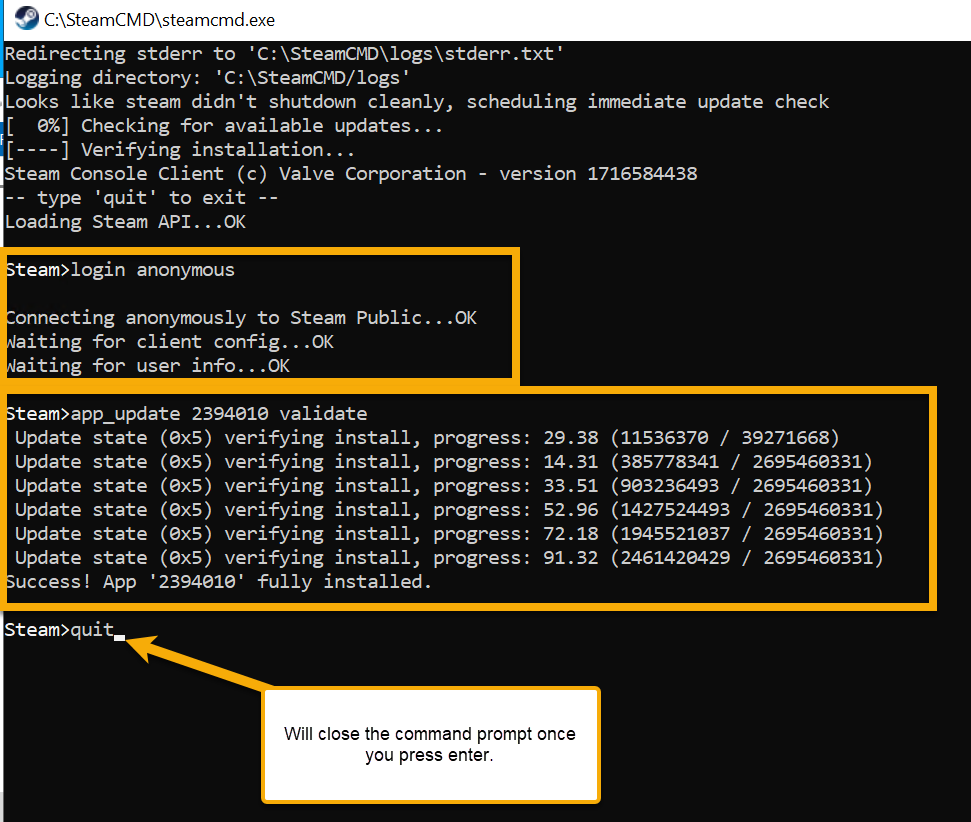
- In the window, type the following commands in order. Note each command has a short description of what it does. Allow each to complete its action before trying to enter the next one.
- Logins into Steam:
login anonymous - Updates Steam & Updates / Installs Palworld Server:
app_update 2394010 validate - Closes SteamCMD:
quit
- Logins into Steam:
- Palworld Dedicated Server is now installed. Go back to your folder where SteamCMD is installed.
- Next, within that folder, navigate to "
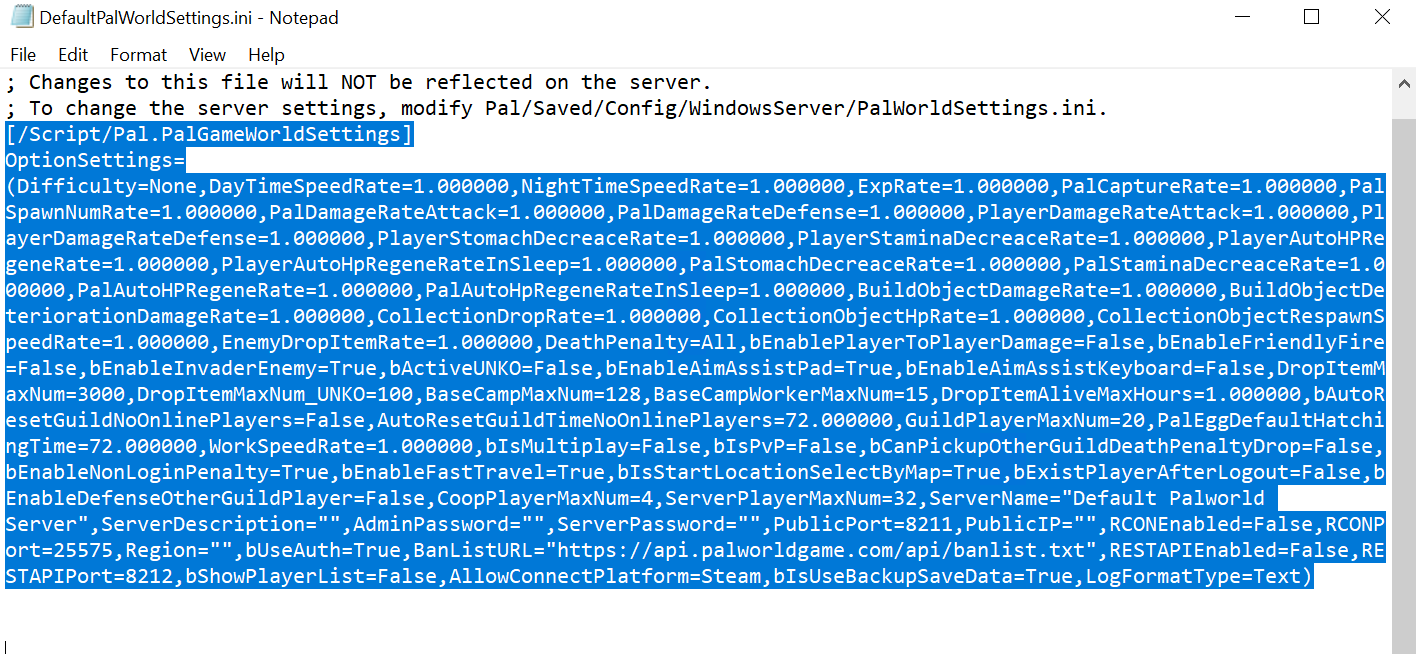
/steamapps/common/PalServer" and run PalServer.exe. A command prompt window will open that says "Setting breakpad minidump AppID = [some numbers]". - Close that command prompt window. Then back in the folder, open "DefaultPalWorldSettings.exe". Copy everything from, and including, the line "
[/Script/Pal.PalGameWorldSettings]" to the bottom of the file, and then close the file.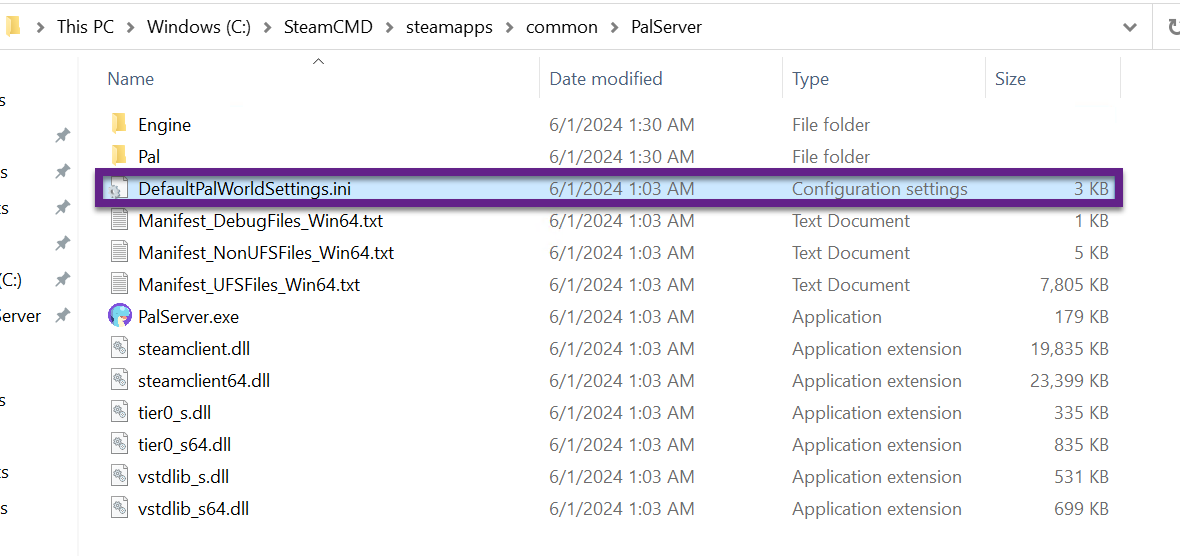
- Back in the folder, navigate to "
/Pal/Saved/Config/WindowsServer" and then open the "PalWorldSettings.ini" locted there, paste the content you previously copied into the currently blank file, and save it.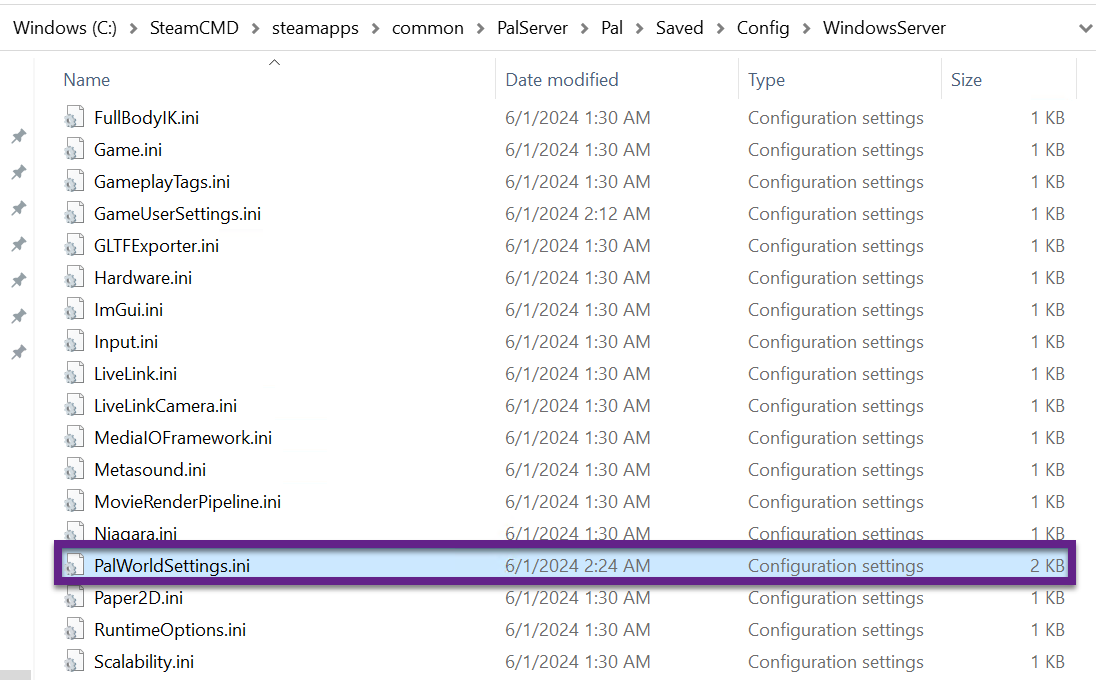
- Next we need to edit a couple of settings. You can edit more if you would like, but these are just the ones needed to make our server function. Once you have made all of your changes, save and close the file.
- Server Name: Give your servr a name if you don't want it to just be "Default Palworld Server Name".
- Server Description: Not required, but you can give a little description that you and users will be able to see under the settings when connected to the server. This could be useful if users have multiple servers they play on.
- Admin Password: Enter the password you want to use to access admin functions within the server.
- Server Password: Enter the password you want users to enter to access the server. Leaving it blank will result in users not needing a password to access the server.
- Public IP: Enter the public IP of your VM displyed on the VM's dashbord in Azure
- Once you have made your changes, including altering any of the other settings listed, you just need to save and close the file.
- I recommend changing the "
DeathPenalty" setting. By default it is set to "All", which means you drop your items and Pals when you die and have to go pick them all back up. You can change it to one of the following:DeathPenalty=0: No death penaltyDeathPenalty=1: drop items onlyDeathPenalty=2: drop items and gearDeathPenalty=All: drop pals, items, and gear
- I recommend changing the "
- Now that we have everything configured, restart your VM before running PalServer.exe again to start the server.
- I'll update this later with steps on how to get Palserver.exe to start when the machine starts, but for now you would need to manually start it. The following might work, but I haven't tried it myself yet because my server is running in Ubuntu.
- If you want to set up the Palworld Server to autostart when the VM is started:
- create a text file with just the file path to your "PalServer.exe" file. It needs to be the full path with "C:\" at the start. If you want a quick way to get the full file path, hold shift and right click the "PalServer.exe" file. Then select "Copy as path". Just make sure to remove the quote marks from around the file path after pasting it.
- Move the bat file to your C drive.
- Create a task in task scheduler that runs the bat file once the computer starts.
- If you want to set up the Palworld Server to autostart when the VM is started:
- You can now move on to connecting to the server.
Connecting to Your Palworld Server
With Pal Server running on your VM, you can now try connecting to it with a Palworld client. Remember that if you are running your server on your home network, you will need to setup port forwarding on your router for anyone outside your network to be able to connect. Additionally, you will need to get the public IP for the machine running the server.
- First verify that your server is running in Azure if that is where you installed and are running Pal Server.
- Manually start the Pal Server if you don't have it setup to auto start when the computer boots.
- On your physical computer that you use for playing Palworld, start the game and click "Join Multiplayer Game".

- On the next screen, you will need to go to the bottom where there is an "Enter Password" checbox and an input field followed by a "Connect" button. Check the box if you added a server password. Then enter in the Public IP address of your VM with ":8211" appended to the end of it.
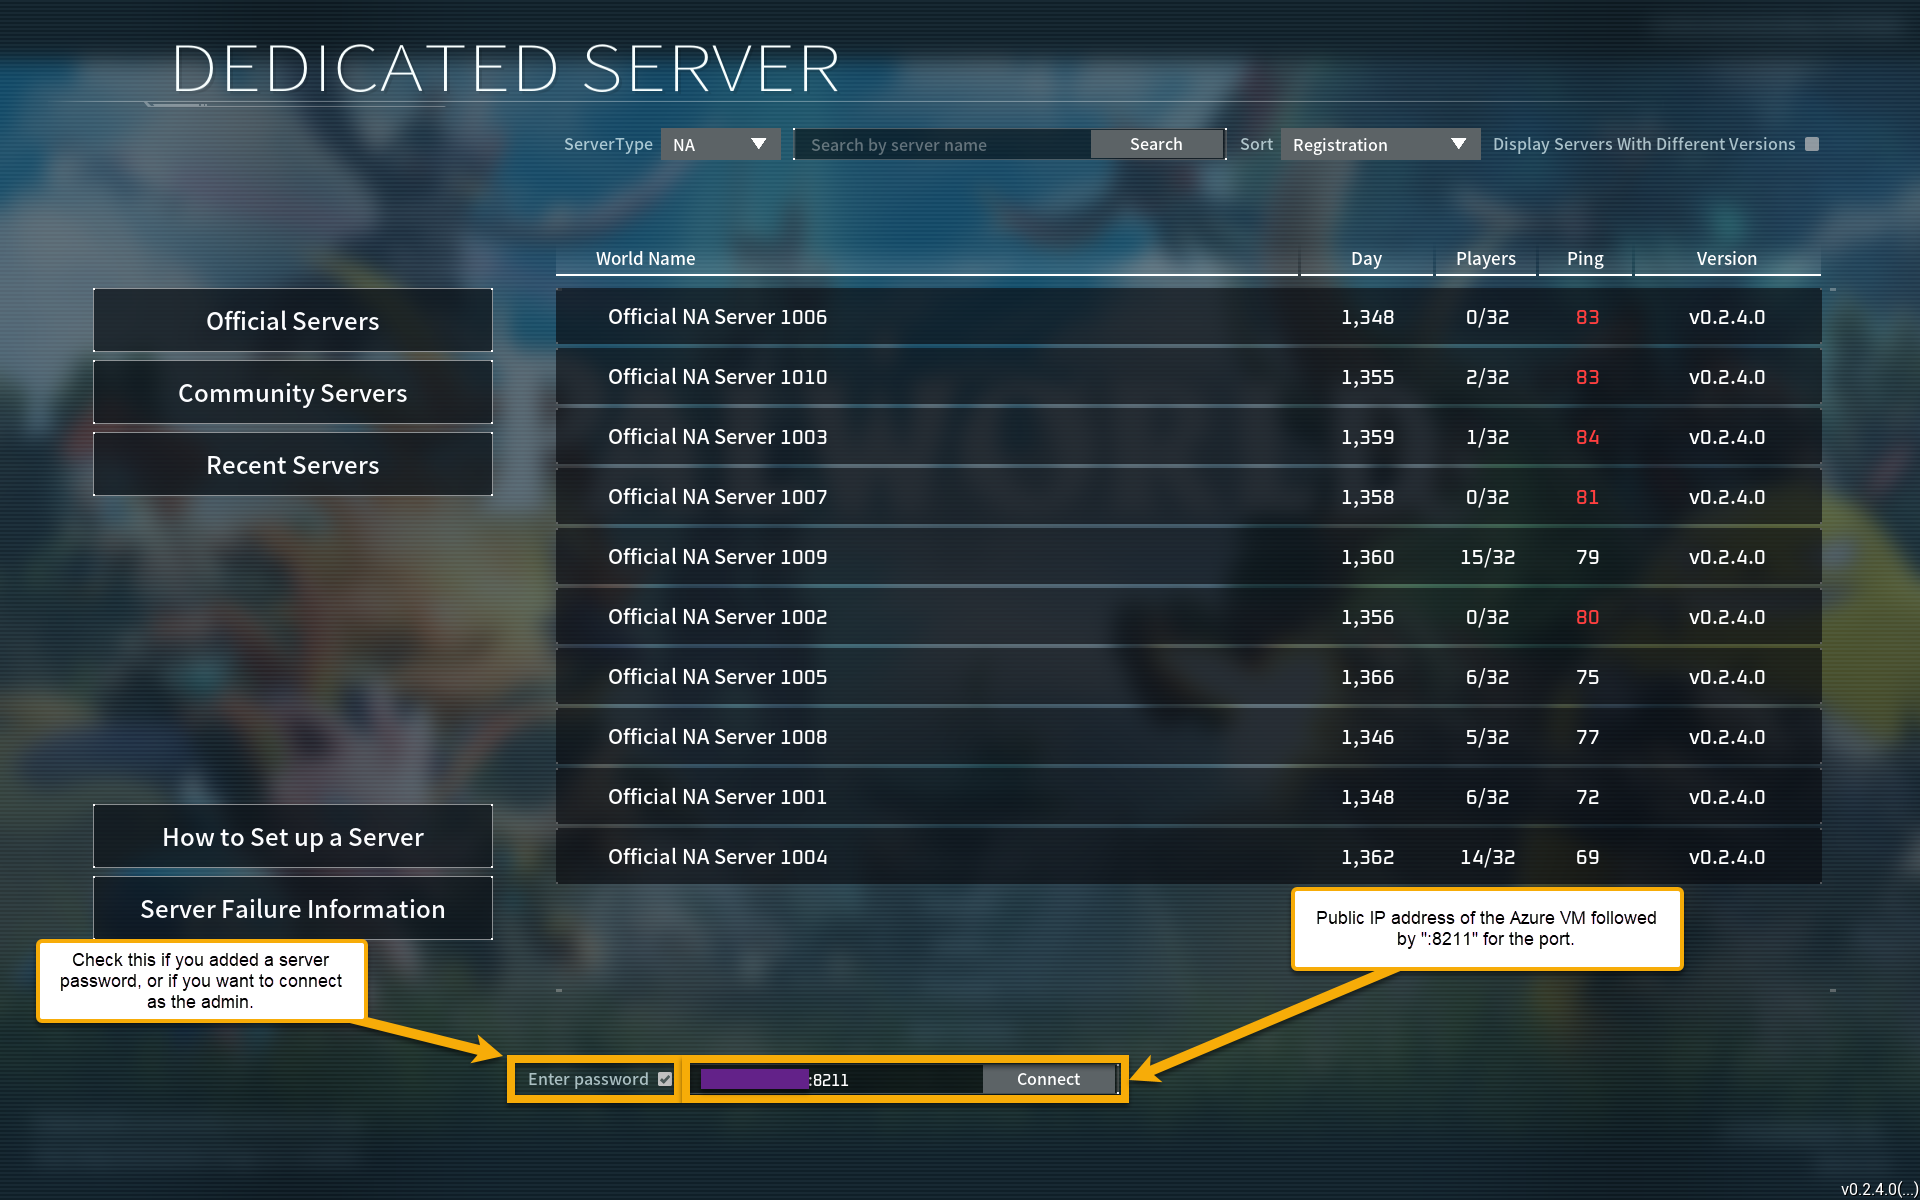
- If you checked the option to enter a password, you will be prompted to enter that password and then need to click "OK". Otherwise, you will just be taken to your server if everything ws set correctly.